Salt Dough Handprint Ornaments You'll Keep Forever
For salt dough ornaments, mix 2 cups flour, 1 cup salt, 1 tablespoon ground cinnamon, and about 1 cup of warm water. Roll to 1/4 inch, cut your circles, press the handprint, poke a hole for the ribbon, then bake at 200°F for 2 to 3 hours, flipping halfway. Let them cool completely and seal both sides before you paint or store them.
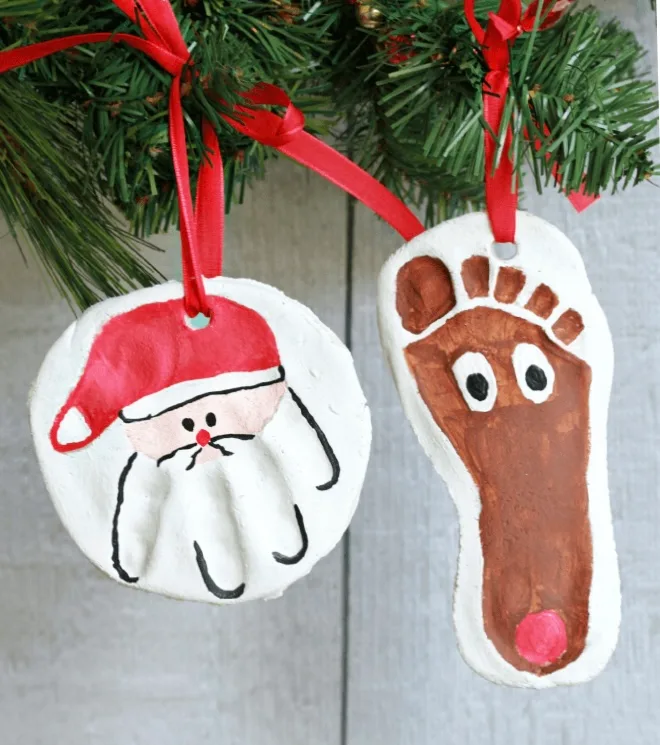
The first year I made salt dough handprint ornaments, I did everything right up until the very last step, and then I put them in a bin in the garage without sealing them. When I opened that bin the next November, my daughter’s handprint had gone soft around the edges and there were little dark speckles all over the back. I actually cried a little bit. Salt dough pulls moisture out of the air, and if you don’t seal it, a Florida summer in a storage bin will absolutely find it!
So this is the version I make now, with the step I skipped. It’s four ingredients, it makes the whole house smell like cinnamon while it bakes, and the single most important thing I can tell you is this: make more than one. Make four. Make six. That hand is only that size for about eleven minutes, and I promise you’ll want one for the grandparents and one for the teacher and one that stays in your box forever.
What you’ll need: -2 cups all purpose flour -1 cup table salt (the cheap round container, not sea salt) -1 tablespoon ground cinnamon -About 1 cup warm water -Nested round cutters -A drinking straw for the hole -Acrylic craft paint and small brushes -Mod Podge (this is the part I skipped!) -Thin satin ribbon
1. The dough
Mix the flour, salt, and cinnamon in a bowl first, then add the warm water a little at a time. I never dump the whole cup in at once because humidity changes everything. Some days I use a scant cup, some days I need an extra splash. You want it to come together like play dough — smooth, not sticky, not crumbly. If it sticks to your fingers, add flour a tablespoon at a time. If it’s cracking, wet your hands and keep kneading.
Knead it for a solid five minutes. I know that feels like a long time, but under-kneaded dough is grainy and it shows in the finished ornament. This is also the part where a toddler is genuinely useful, so hand them a chunk!
The cinnamon does two things. It turns the dough a warm tan color instead of that pasty gray-white, and it makes your kitchen smell like a bakery for the entire afternoon. One tablespoon is plenty. I tried two once and the dough got a little dry and dusty on me.
2. Nested round cutters
It took me forever to find a circle cutter set that wasn’t either three plastic cutters for a dollar or a fifty dollar copper set from a specialty baking shop. This stainless one has eleven graduated sizes in a little tin, which sounds like more than you need until you’re standing there realizing a two year old’s hand and a nine year old’s hand are not the same size at all.
Roll your dough out to about 1/4 inch. Thinner than that and the ornaments warp and curl at the edges while they dry. Thicker and they take forever to dry all the way through, and you end up with a soft center you don’t discover until it’s too late. I use two wooden paint stir sticks on either side of the dough as a guide, which is not fancy but it’s free and it works every single time!
3. The actual handprint
Here’s what nobody tells you. Press the hand down firmly and once. Do not lift and re-press. The second press is always slightly off from the first and you get a blurry double edge that no amount of smoothing will fix.
Have your kid press their hand flat with fingers slightly spread, then help them lift straight up. If it comes out crooked, ball the dough up and roll it again — that’s the whole reason we made a double batch. And do the hole now, not later, with a plain drinking straw. Poke it about a half inch down from the top edge and wiggle it out gently. If you wait until they’re baked, you will crack one. I cracked two, y’all!
4. Bake low, slow, and flip them
200°F. That’s it. Any hotter and the dough puffs up like a biscuit and the fingerprints blow out!
Line a sheet pan with parchment and give the ornaments a little space between them. Bake for about an hour, then carefully flip each one over and bake another hour to hour and a half. They’re done when they sound hard and hollow if you tap them and there’s no give in the center. Thicker ones can take three hours. There is no rushing this part, and honestly I just do it on a Sunday afternoon while I’m doing other things.
Let them cool completely on a rack. Completely. Warm ornaments and Mod Podge do not get along!
5. Paint and brushes
I use plain acrylic craft paint, the little two ounce bottles. This 18 color set is what I keep in the craft drawer and it covers everything I’ve ever wanted to do — white for filling in the handprint, red and green for a little holly, a soft cream if you want the whole thing painted.
You do not have to paint the whole ornament, and I’d argue you shouldn’t. My favorite ones are the ones where the cinnamon dough shows and I only painted inside the handprint itself. A thin brush is a must for that, and for writing the year and their name on the back. Write the year. Write the year! I have exactly one ornament with no year on it and it drives me a little crazy every December.
Let the paint dry a couple hours before the next step.
6. Seal them — the step I skipped
This is the one. Mod Podge, two coats, on every surface. Front, back, the outside edge, and swipe a little around the inside of the ribbon hole with a small brush. That edge is where moisture gets in, and the edge is exactly the part everyone forgets.
Let coat one dry for a full hour before coat two. I use matte because I like the finish better on the cinnamon dough (gloss makes it look a little plasticky to me), but either one seals just fine. If you want a gloss look, do your two matte coats first and finish with one gloss on the front only.
Do not skip this to save twenty minutes. My unsealed batch lasted exactly one summer!
7. Ribbon
Thin ribbon, 1/4 inch, and I like satin because it sits flat and doesn’t overwhelm the ornament. This set has twenty colors, so I can match the ribbon to whatever tree I’m doing that year instead of buying a new spool every season. Cut about ten inches, thread it through, and tie a simple knot rather than a bow — a bow on the top of a handprint ornament fights with the handprint.
8. Store them like they matter
They do matter! Salt dough is more fragile than it looks and it does not want to be at the bottom of a bin under a garland. I keep mine in a divided ornament box with the trays, so each one gets its own little padded square and nothing rubs against anything else. This one is what I use, and this drawer-style box is a good option too if you want acid-free trays.
If your garage runs hot and humid like mine does, keep the keepsake ones inside the house. A closet shelf is fine. I learned that the expensive way.
That’s the whole thing! Four ingredients, an afternoon, and something you’ll unwrap every single year and get a little emotional about. My daughter is nine now and the tiny two year old hand on our tree is still the first ornament I hang.
If you make a batch of these, be sure to post on instagram and tag me @sugardesignco so I can see those sweet little handprints!
-Ciera
Made something with this? Tag me @sugardesignco — I love seeing them.
Questions I get asked
- Why did my salt dough ornaments puff up or crack?
- Almost always the oven was too hot. Salt dough needs to dry out, not bake, so 200°F for a few hours is the goal. If the edges are curling, your dough was rolled too thin. A quarter inch is the sweet spot.
- Do salt dough ornaments really last?
- They do if you seal them. Mine from the first year got soft and speckled in storage because I skipped that step. The sealed ones are still perfect. Two coats of Mod Podge on every surface, including the edges and the hole.
- Can I air dry them instead of baking?
- Yes, but plan on two or three days on a wire rack, flipping them a couple times a day so both sides dry evenly. The oven is faster and I think it gives you a harder ornament, but air drying works fine if you don't want the oven tied up.
- Does the cinnamon make them smell like Christmas?
- The house smells amazing while they bake, and the ornaments hold a faint warm smell for a few weeks. Mostly the cinnamon is there for color. It turns the dough a soft tan instead of that flat gray-white.
- How do you seal cinnamon salt dough ornaments?
- Wait until they're completely dry and cool, and until any paint has dried for a couple of hours. Then brush on two coats of Mod Podge, letting the first dry for an hour, and cover every surface: front, back, the outside edge and inside the ribbon hole. A clear acrylic sealer spray works too if you'd rather spray. Just do light coats on both sides.